Blog
May 11, 2015
Booting Kali Linux Live Over HTTP
Kali Linux Features Here at Offensive Security, we tend to use Kali Linux in unconventional ways – often making use of some really amazing features that Kali Linux has to offer. One of these interesting use-cases includes booting instances of Kali Linux Live over HTTP, directly to RAM. We realized there’s little documentation around this
2 min read

Kali Linux Features
Here at Offensive Security, we tend to use Kali Linux in unconventional ways – often making use of some really amazing features that Kali Linux has to offer. One of these interesting use-cases includes booting instances of Kali Linux Live over HTTP, directly to RAM. We realized there’s little documentation around this feature and thought we’d shed some light on it so others may enjoy this feature as well.
Booting Kali Over HTTP – Overview
The basic premise involves using the Kali Live kernel and initrd for booting, while calling the Kali root filesystem through an HTTP URI. The initial boot process can take place over the network (via PXE) or a minimal Kali Linux USB/CD – while the remote root filesystem is a squashfs image served over HTTP via an Apache server.
In this example, we’ll have the initial kernel boot via PXE and we will obtain the kernel, initrd, and squashfs filesystem we need for this exercise from a full Kali Linux release ISO from within the “live” directory. We copy the initrd and kernel into the TFTP root folder, while the squashfs file goes into the web root:
[cc lang=”text”]mkdir /mnt/iso
mount -o loop kali-linux-1.1.0a-amd64.iso /mnt/iso/
cp /mnt/iso/live/{initrd.img,vmlinuz} /tftpboot/
cp /mnt/iso/live/filesystem.squashfs /var/www/
apachectl start[/cc]
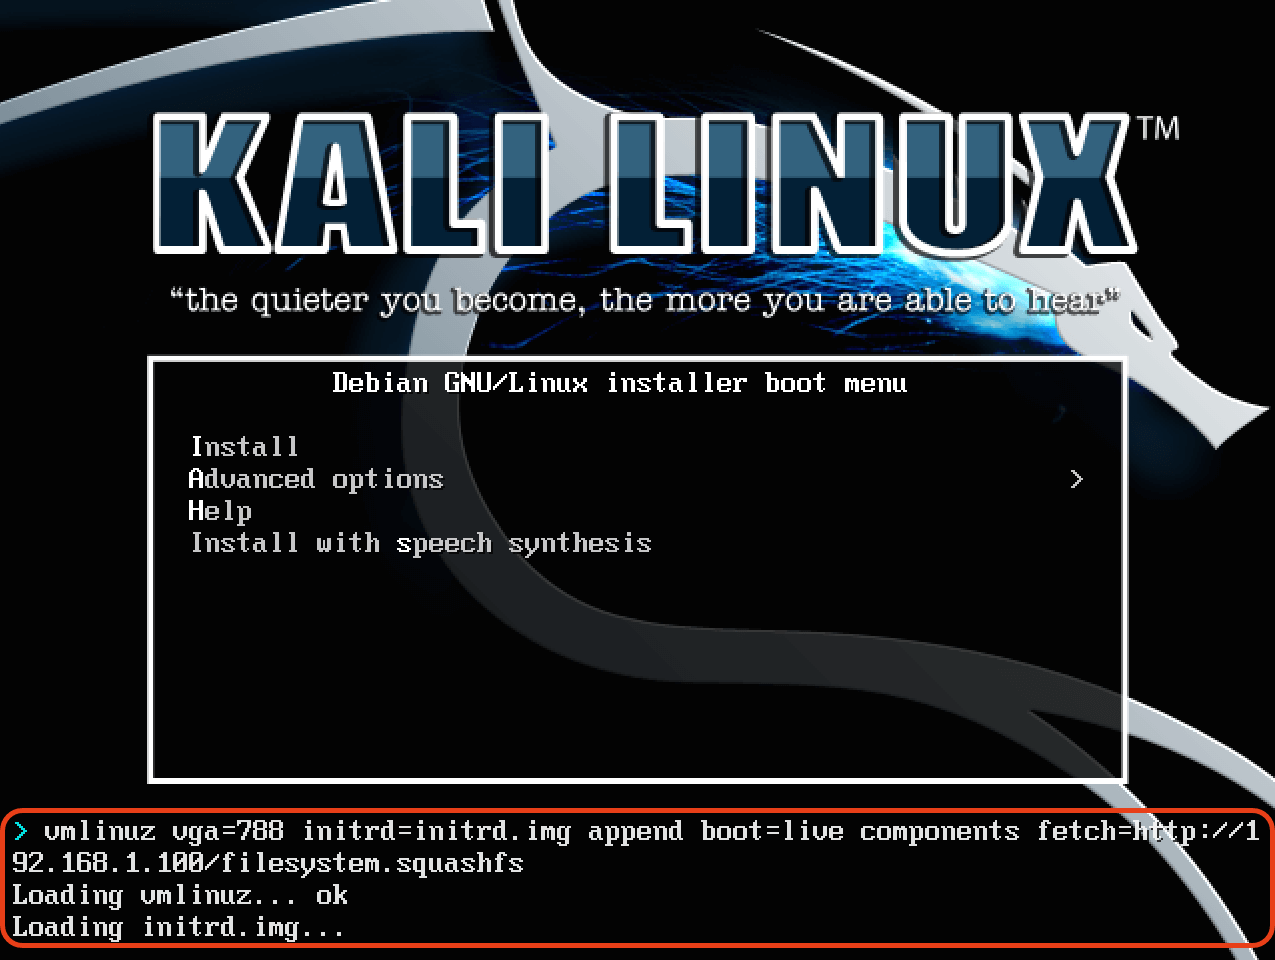
In this example, we’ll obtain the kernel, initrd, and squashfs filesystem from a full Kali Linux Bootable ISO (in the “live” directory) and then proceed to boot the kernel and initrd over PXE. Once the Kali boot screen appears, we need to alter a few boot parameters as shown in the screen shot below:
As the squashfs filesystem loads to RAM, the filesystem itself can’t be larger than the amount of RAM available on the computer – meaning that for booting a standard Kali ISO as shown above, we’d need at least 4 GB of RAM. Of course, this can be remedied by making a smaller, custom Kali ISO images, perhaps with different toolsets and uses.
Latest from OffSec

Enterprise Security
Red Team vs Blue Team in Cybersecurity
Learn what a red team and blue team in cybersecurity are, pros and cons of both, as well as how they work together.
Dec 13, 2024
13 min read

Enterprise Security
Building a Future-Ready Cybersecurity Workforce: The OffSec Approach to Talent Development
Learn all about our recent webinar “Building a Future-Ready Cyber Workforce: The OffSec Approach to Talent Development”.
Dec 13, 2024
4 min read

Enterprise Security
How to Become the Company Top Cyber Talent Wants to Join
Become the company cybersecurity talent wants to join. Learn how to attract, assess, and retain experts with strategies that set you apart.
Dec 4, 2024
5 min read
